Our Fool Proof System For Outdoor Landscape Lighting In Houston Part I

An Easy 5-Step System For Houston Landscape Lighting Part I

If you are looking for a way to make your home’s exterior more beautiful and dramatic after dark, installing landscape lighting is an excellent option. The five steps outlined below will help you create an outdoor space that is not only functional but also attractive, even after the sun has set.

Step 1: Choose Several Key Focal Point

Evaluate your outdoor area during daylight hours, searching for features that you want to highlight. For instance, maybe you have a large tree or a small group of shrubs on your property that you would like to draw attention to. Perhaps you have a beautifully designed wall made of stone. Maybe the exterior of your home has a unique texture thanks to the fact that it is made out of brick or stucco. Other characteristics that could be worth highlighting include water features, flowering shrubs, or garden gates. The features you choose to highlight will be the first things that people notice after dark, so make sure to choose them wisely. After planning your focal points, you can then move on to designing lighting for other areas like your decks, sidewalks, or walkways.

Step 2: Draw Your Outdoor Space

Making a sketch of your outdoor space is extremely beneficial during the planning process. Start by drawing lines that indicate the outer edge of your property. Next, add in key features like your house, outbuildings, decks, trees, outdoor furniture, or other large elements that you are planning on keeping in their current place. In your drawing, identify the focal points that you decided to highlight in the first step. Write down the general measurements of each feature, including its height and length. If you already have landscape lighting installed, note where your current lighting fixtures are placed. This information will make it easier to decide whether you can get by with 12 V landscape lighting or whether you need to install a 120 V system.

Step 3: Choose Your Light Fixtures

To get the best results, you need to make sure that the light fixtures that you choose for each area of your outdoor space are appropriate. Depending on your space, you may need a combination of floodlights, accent lights, and in-ground fixtures. Thanks to today’s technology, the color, and brightness of the light emitted by all of these different types of fixtures can easily be controlled.

Whether you have a 12V system or a 120 V system, you typically have a couple of different options when it comes to materials. These include k-alloy aluminum and solid die cast brass. Although both of these types of materials have a bronze finish, solid die cast brass is a better choice if you live near the coast or in an area where there is a lot of moisture. Some of the factors that influence whether you can get by with a 12 V system or whether you need to install a 120 V system include the following:

  • Whether or not you already have outdoor lighting installed.
  • The overall size, shape, and layout of your space.

120 V systems can be quite costly and labor-intensive to install. Typically, the wiring for these systems is required to be buried deep underground. Because of that, most experts recommend only opting for 120 V lighting if the wiring is already installed in your outdoor space or if there is a nearby electrical outlet that you can use to power the system. If neither of those situations applies, installing a 12 V system is a much easier and more affordable choice.

The section that follows describes some of the most commonly used outdoor light fixtures along with information on the specific situations that they are designed for.

  • Path Lights. These lights are designed to light up sidewalks or pathways, making it easier for people to see where they are going when they arrive at your home after dark.
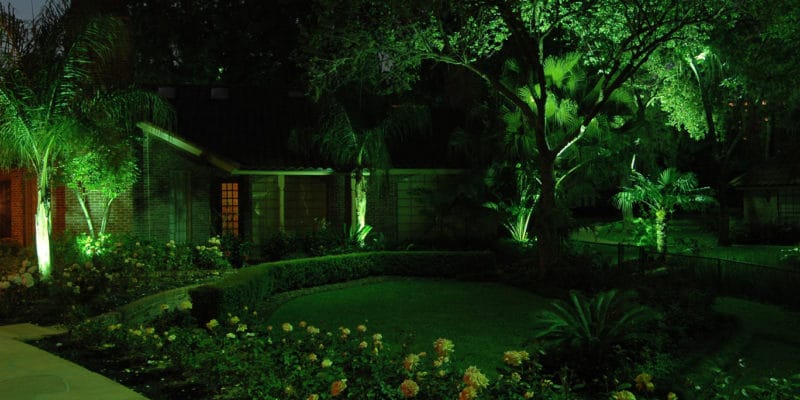
  • Accent Lights. These lights can be used to create a number of different effects, depending on how they are installed. If you point them in a downward direction, they tend to add a sense of moodiness to the space. On the other hand, if you point them up at different objects, they can add a lot of drama to your landscape. They are perfect for illuminating focal points like trees or architectural features in your outdoor space.
  • Wash Lights. If you have a wall, fence, or another relatively wide surface that you want to light, a wall wash light is a great choice.
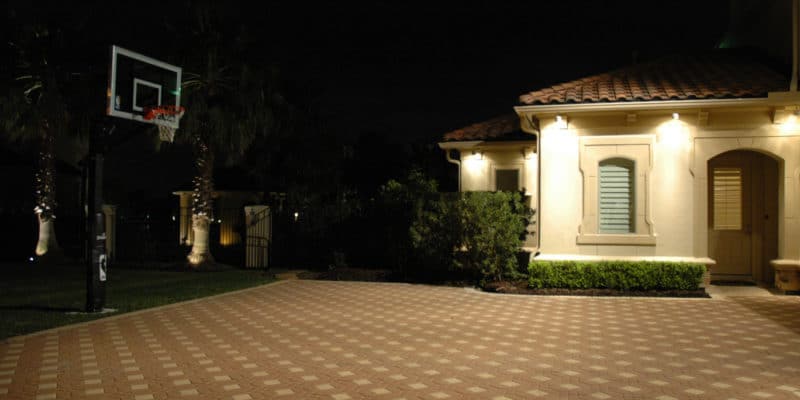
  • In-Ground Lighting. With these lights, the body of the light is buried in the ground. They are an excellent choice for lighting driveways or pathways. They can also be used to light features in your yard like trees or shrubs.
  • Hardscape lights. If you have structural features in your yard like walls, benches, columns, decks, or outdoor cooking surfaces, hardscape fixtures are the best choice for providing light. The unique low-profile design of these fixtures makes them easy to hide when installed on or near architectural features.
  • LED Tape Lights. For a subtle lighting effect, consider installing LED tape lighting around objects that are difficult to light in any other way. For instance, you can place a strip of LED lighting around your porch roof or in an outdoor kitchen. Some types of tape lighting can be used underwater, as well, making them perfect for installing in backyard water features.
  • Step lights. If you have stairs in your backyard or if you need to mark the edge of a deck or patio, step lights are a great way to keep your outdoor space safely illuminated.
  • Indicator lights. These lights are often used around the outer perimeter of a property in order to indicate where the property ends.

For more on this topic, read on to the next article. If you would like to discover more tips and tricks, visit our blog. Call or contact us today for more information!

Our Fool Proof System For Outdoor Landscape Lighting In Houston Part II

An Easy 5-Step System For Houston Landscape Lighting Part II

Step 4: Spacing Outdoor Fixtures

How far apart landscape lights should be set is a subjective, situational decision. Most lights come with six feet of lead wire, but lights can be spaced closer or further apart as necessary.

Here are some basic spacing suggestions for different landscape lighting situations:

  • Path & Area Lights: Path and area lights can be set 10 feet apart. Remember, the goal here is to guide people down a path, not illuminate it completely.
  • Accent & In-Ground Lights: Small objects can be lit with one or two fixtures. Larger objects, like large-canopy trees, may need three or four. As a rule of thumb, use more lights when you anticipate multiple viewing angles. Most in-ground light fixtures allow you to adjust their angle and overall light output. Order a few extra and make adjustments based on the way the lights actually work on your property.
  • Wall Washers: You can get even illumination on walls by placing your lights one to two feet away from the base of the wall. Space the fixtures out with six to eight feet in between them.
  • Hardscape Fixtures: Use three-inch light strips in tight spaces. Six-inch strips are standard for illuminating deck handrails, steps, and retaining walls. Order larger sizes if you have need of more illumination.
  • Tape Lights: Tape lights have certain built-in maximums. Runs can be no longer than 40 feet, and each run can carry no more than five amps. Tape lighting is typically sold in one, five, and 10-foot lengths.
  • Step Indicators: Light outdoor entertainment areas (e.g. patios and decks) wherever you expect foot traffic.
  • General Indicators: Marky out the edges of spaces you want to define with lights spaced at least two feet apart.

Step 5: Running Wires, Powering Lights, Final Adjustments

Your last step is to move from your layout sketches to real life. If you’re building a 12V system, you’re probably running all of your fixtures off one transformer. This is feasible even if your setup includes both dry and wet (i.e. underwater) fixtures. Most 12V transformers can be plugged directly into a standard power outlet. These transformers are available in different wattage capacities; you can cover anything from 75 to 600 watts with a standard transformer. Size your transformer according to the number of fixtures and runs in your layout.

It’s a good idea to leave a little additional capacity in your system. This allows you to add on new fixtures later, if, for instance, you install a new feature you want to light. A little foresight can save you the expense of revising your entire setup.

Don’t forget to add a timer or a photocell to switch your lights on and off automatically.

A smart landscape lighting setup will use the latest and greatest technologies (like high-efficiency LEDs) to bring your property to life. Make your outdoor areas safe and beautiful after dark with our cutting-edge LED landscape lighting.

For more information, feel free to contact us or call today! Visit our blog for more outdoor lighting tips!

Outdoor Lighting Tips For Your Landscape Part II

Landscape Outdoor Lighting Tips To Help You Improve Your Yard Part II

Tip 3: Broaden Your Outdoor Lighting Cost Definition

Initial price only provides you with a narrow view of what a home improvement project’s true cost is over the entire lifetime of your house. A low price might translate into a great deal, or it could be a sign of low durability or quality. It could also mean that the price doesn’t include some of the building, material, or design costs. In the long run, a more expensive purchase price might actually be a better deal. When resource-efficient quality fixtures are selected it can help you reduce your home’s overall living cost. The only thing that is guaranteed when you make your decision based just on bid price is that you won’t ever be operating on the basis of lowest total cost. When the lower or lowest bid is viewed as the winner, it is safe to conclude that you have seriously misguided builders and companies that you are dealing with. When it comes to the real home building, remodeling and improvement world, there are no commodities. Everyday experience provides this over and over again, so it is a mystery why the lower-bid or low-bid approach is still in existence. Hiring someone just on the basis of price is the best way to sabotage your project’s budget and quality. Robert Huff is the #1 outdoor lighting company in Houston so consider hiring the best.

Tip 4: Have Your Outdoor Lighting Contractor Buy The Materials

If you purchase products online you can save some money. However, most homeowners aren’t sure of what they need to buy, and what fits or goes together or how much or what exactly to purchase. When you make product procurement mistakes it takes a lot of the responsibility away from the outdoor lighting contractor and can invariably lead to the blame game when something goes wrong. You don’t have to keep going back and forth to exchange the wrong items for the right ones.

Tip 5: Hire The Real Deal

When you hire someone who specializes in and has experience with your specific kind of project, it results in you having a higher quality project, and one that is more timely and efficient, and with increased levels of design and product knowledge. Whenever you are looking for an outdoor lighting contractor to hire, be sure they have 10 years of hands-on, proven experienced at least. Experience working on actual jobs and not just somebody who does the selling or manages from behind their desk. The very best outdoor lighting contractors are the ones who continue actually doing transformer balancing, wire connecting, and fixture installation work, no matter how long they have been in business. Although it is physically demanding work, doing it helps to keep them up-to-date. Those are the kinds of outdoor lighting contractors who truly know and understand their business since they are doing it physically every day – and they aren’t simply pushing a pencil and know exactly what they’re talking about.

Tip 6: Hire An Experienced Outdoor Lighting Company

One of the biggest investments you can possibly make in your home and life is a home improvement project. You can also earn some of the highest possible returns on investment with home outdoor lighting. For example, a remodel or home improvement job that is done properly can return more than its investment value. Having a well designed and built home improvement project can return more than you invest in the project. By contrast, a poorly designed and construction project may cause a lot of damage that is far in excess of the amount of money you thought you were saving when you hiring a guy that your friend had paint his house. Experienced outdoor lighting contractors who have decades of hands-on work experience are the only ones who are thoroughly familiar with the construction process and know exactly what to do. The best way to keep your personal belongings and assets protected is to make sure you hire an insured, licensed, and experienced contractor for your home improvement project. Make sure you have a written contract that describes and lists exactly everything you are receiving. Your contractor should deliver high-quality, pain-free, and consistent results.

For more information please make sure to contact a professional outdoor lighting expert today by calling us at 713.861.2000. If you are interested in reading more related content be sure to visit the outdoor lighting blog.

Outdoor Lighting Tips For Your Landscape Part I

Landscape Outdoor Lighting Tips To Help You Improve Your Yard Part I

Home improvement projects are among the most stressful tasks that you can take on. A significant investment of money and time is required by these projects. Despite all that, every year, millions of individuals need and want to improve their properties and homes. Quite often it simply isn’t feasible or cost effective for them to move. The answer is remodeling to improve their homes. However, the last thing you want is to end up with a home improvement nightmare. I’m sure relatives and friends have told you that you need to expect a nightmare. Often home outdoor lighting projects will take three times or longer to complete and cost at least twice of what you are were expecting. It doesn’t have to be that way. It is possible to find a dependable and honest home improvement professionals if you follow the steps that we have outlined below. The following are the top tips by Robert Huff Outdoor Lighting for succeeding with your home improvement project. I am very confident that if you simply follow these tips that you will more than double your chances of succeeding with your landscape outdoor lighting project.

Tip 1: Make A Plan For Your Outdoor Lighting

You wouldn’t go on an expensive long vacation without planning your trip and be having a roadmap, would you? Of course, you wouldn’t! That would be disastrous. Your trip would end up being full of expensive changes and unwelcome surprises. The same thing is true with home improvement projects. I have always believed that anything that is planned carefully and executed properly has a great chance of succeeding. An excellent design-build partner can help you determine what you need and want before you begin to put everything down on paper and create your plan. Professional design work that pays great attention to detail will help to ensure that your project ends up being beautiful, on a budget, and on time.

Tip 2: Don’t Get Started Until You Get Everything You Need

Imagine this – your yard is demolished by your landscape outdoor lighting contractor. It is only supposed to take one month to finish the job. Then three weeks later you still are attempting to get a hold of him. When you finally answers his cell phone he says that he won’t be able to return for a couple of weeks because he is busy on a different project. He also tells you that the trees that he wants to use in your project are not available so your job is delayed for 4 to 6 weeks now. This means your landscape outdoor lighting contractor will need to be told that the schedule for the project has been delayed. This is not a good situation and everyone is affected that is involved in the project and especially you. Unfortunately, this happens all too often, and you need and want an outdoor lighting contractor who can get all of the necessary products ordered, get them in, and then make sure that they are not broken, are the right color, and fit together correctly before your job is scheduled. Don’t let anyone tear your property up until you have everything that you need to keep your project running smoothly and on time and everything is delivered to your site. Make sure your outdoor lighting contractor shows you want work is going to be done, by whom, and on what dates. You don’t want to have any surprises. It is important for you to know exactly what is happening on a daily basis.

To speak with a professional, please make sure to contact an outdoor lighting expert today by calling us at 713.861.2000. If you are interested in reading more related content be sure to visit the outdoor lighting blog.